Although Revit transformations may appear as a complex topic at first sight, they focus on simple and elementary geometric concepts employed programmatically. Essentially, they serve as methods for relocating a point or an object in the 3D space, based on a predefined logic.
Transformations are indeed tools that give us more freedom when programming for Revit. They help with tasks such as comparing geometries, positioning them to one another, or determining their locations within a new coordinate system.
We will explain these geometry concepts, and how the Revit API allows us to use them according to the object-oriented paradigm. We will focus on two transformations : translations and rotations. The given code examples are written in C#.
Translations
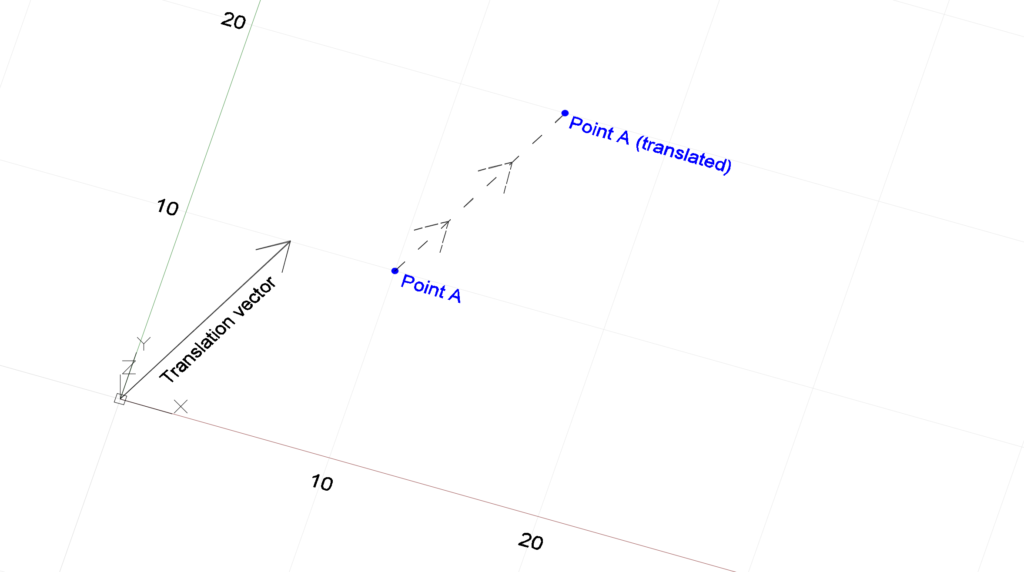
Translations involve moving a point using a vector. This point moves based on the vector’s direction and length. Let’s see how we can do this programmatically using the Revit API :
public class Transformations
    {
        public void MakeTranslation()
        {
            XYZ pointA = new XYZ(10, 10, 0);

            XYZ translationVector = new XYZ(5,10,0);

            Transform transform_Translation = Transform.CreateTranslation(translationVector);

            XYZ pointA_Translated = transform_Translation.OfPoint(pointA);
            // pointA_Translated coordinates will be : 15,20,0
        }
    }
Both pointA and translationVector are of the XYZ type. In the Revit API, an XYZ type represents both a point in the 3D space and the vector going from the origin (0,0,0) to that point.
We will then create a Transform object called transform_Translation, holding the instructions for moving pointA. Instead of using a constructor, new Transform objects may be instantiated using static methods. For our purpose, we’ll use Transform.CreateTranslation() and provide the translationVector as an argument.
When inspecting our newly instantiated transform_Translation object using Visual Studio, we get the following information:
The first highlighted field IsTranslation confirms the transformation type. The field Origin represents the translation Vector as an XYZ type.
Finally, we apply the intended transformation to pointA using the transform_Translation object. The transform_Translation.OfPoint() method applies the transformation to its argument, translating the pointA and returning a new XYZ object at the coordinates (15,20,0).
Rotations
Rotations involve moving a point along a defined circle and following a rotation angle. As in the previous example, this transformation could be done programmatically. We will discuss two cases: Rotating around the coordinate system’s origin, and rotating around another specific point.
Rotations around the coordinate system’s origin
public class Transformations
{
public void MakeRotation()
{
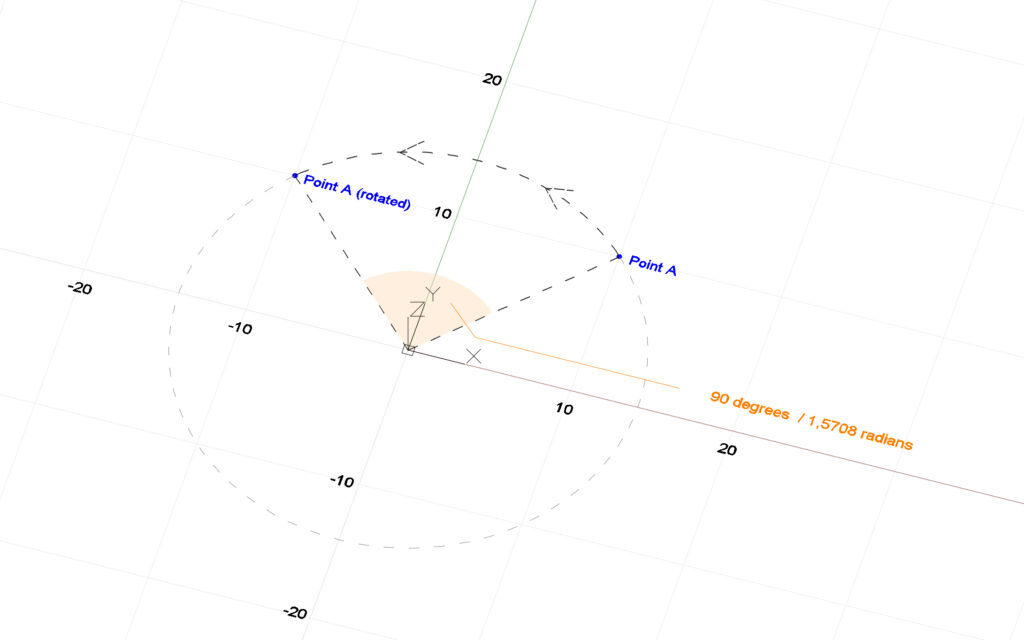
XYZ pointA = new XYZ(10, 10, 0);
XYZ rotationAxis = new XYZ(0, 0, 1);
double rotationAngle = 1.5707963268;
// The angle unit is in Radian, and corresponds to 90 degrees.
Transform transform_Rotation = Transform.CreateRotation(rotationAxis, rotationAngle);
XYZ pointA_Rotated = transform_Rotation.OfPoint(pointA);
// pointA_Rotated coordinates will be : -10,10,0
}
}After defining pointA, we need to specify which plane the rotation will take place on. In this case, we’re opting for the horizontal plane.
One way of specifying the chosen plane is by defining its normal. In our case, the plane’s normal is a perfectly vertical vector, starting from the origin (0,0,0) and heading upwards to point (0,0,1). Let’s call this vector rotationAxis.
rotationAngle is defined in Radian unit. If the angle’s value is positive, the rotation goes counter-clockwise; if negative, it goes clockwise. However, please note that this rule is reversed if rotationAxis points downwards to the point (0,0,-1).
Similar to the translation example, we will use a static method to instantiate the transform_Rotation object, holding the logic to rotate pointA. To rotate around the origin of the coordinate system at point (0,0,0), we’ll use Transform.CreateRotation() method. This method takes two arguments : rotationAxis and rotationAngle.
When inspecting our newly instantiated transform_Rotation object using Visual Studio, we get the following information:
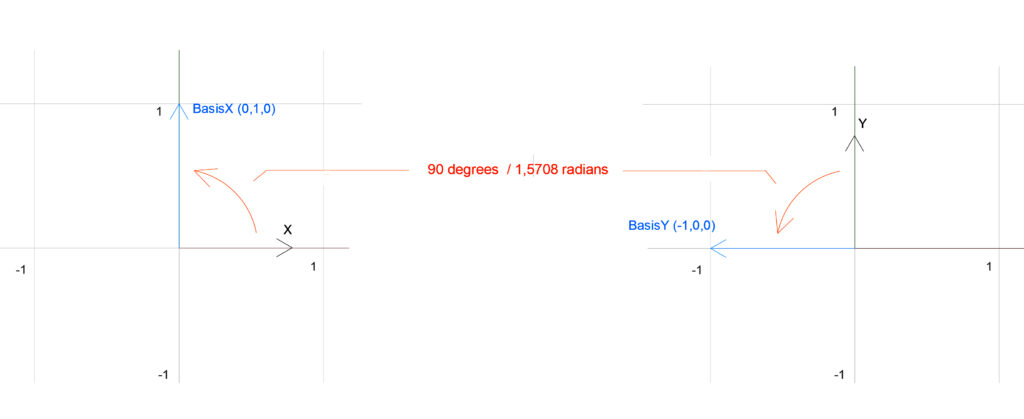
This transformation is obviously not a translation, as shown by the IsTranslation field’s value. However, what is interesting here is the value of the BasisX and BasisY fields.
These values indicate the rotation angle of the recently instantiated transform_Rotation object. They represent the coordinate system axes as if they were rotated by this angle. The following scheme will help us better understand this principle :
Finally, we implement the rotation on pointA using the transform_Rotation.OfPoint() method. This returns a new XYZ object representing the pointA_Rotated at coordinates (-10,10,0).
Rotations around a specific point
public class Transformations
{
public static void MakeRotationAtPoint()
{
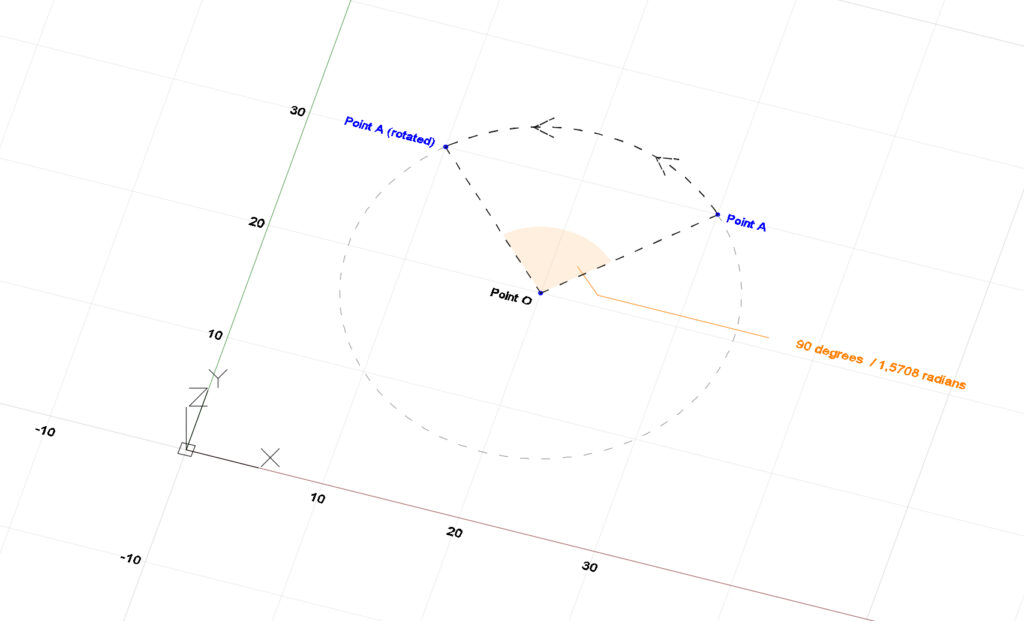
XYZ pointA = new XYZ(30,30,0);
XYZ pointO = new XYZ(20,20,0);
XYZ rotationAxis = new XYZ(0, 0, 1);
double rotationAngle = 1.5707963268;
// The angle unit is in Radian, and corresponds to 90 degrees.
Transform transform_Rotation = Transform.CreateRotationAtPoint(rotationAxis, rotationAngle, pointO);
XYZ pointA_Rotated = transform_Rotation.OfPoint(pointA);
// pointA_Rotated coordinates will be : 10,30,0
}
}In this example, pointA will rotate around pointO. Therefore, we’ll employ another static method to create our Transform object : Transform.CreateRotationAtPoint(), taking an additional argument : the rotation’s origin. For the rest, the code remains very similar to the previous case where the rotation was centered around the origin of the coordinate system.
Once we apply the transform_Rotation.OfPoint() method. The result is a new XYZ object representing the pointA_Rotated at coordinates (10,30,0).
Translations + Rotations
As we saw previously, a Transform object in Revit can hold the instructions for translating or rotating a point. However, these objects can also blend multiple transformations together.
Transform objects describing multiple transformations are quite common when working with some Revit objects. For example, each FamilyInstance object contains a Transform object that informs us about the family instance position in space. Meaning : how far it has been translated starting from the coordinate system’s origin, and to which angle it has been rotated in relation to the coordinate system’s axes.
Let’s see how the previous examples of translation and rotation operations could be combined to form one single Transform object and used to move a specific point.
public static void MakeRotationAtPointPlusTranslation()
        {
            XYZ pointA = new XYZ(30, 30, 0);


            // Defining the rotation transformation

            XYZ pointO = new XYZ(20, 20, 0);

            XYZ rotationAxis = new XYZ(0, 0, 1);

            double rotationAngle = 1.5707963268;

            Transform transform_Rotation = Transform.CreateRotationAtPoint(rotationAxis, rotationAngle, pointO);


            // Defining the translation transformation

            XYZ translationVector = new XYZ(5, 10, 0);

            Transform transform_Translation = Transform.CreateTranslation(translationVector);


            // Combining the rotation and translation transformations

            Transform transform_RotationPlusTranslation = transform_Translation.Multiply(transform_Rotation);


            // Applying the combined transformation on the point A

            XYZ pointA_RotatedAndTranslated = transform_RotationPlusTranslation.OfPoint(pointA);
            // pointA_RotatedAndTranslated coordinates are 15,40,0
        }
Combining two transformation has been made possible using the Transform.Multiply() method. It is important to note that the order in which the two transformations are multiplied determines which of them will execute first. The transformation passed as an argument to the Multiply() method executes first ( here : transform_Rotation ), and the one calling the method executes last (here : transform_Translation )
In summary : PointA is first rotated to coordinates (10,30,0), then it is translated using the translationVector from that position to point (15,40,0).
Conclusion
As we’ve seen, Revit Transformations are quite simple concepts to catch. Using them will give you greater flexibility when handling Revit objects, and a better understanding of the transition between the global coordinate system and an object’s local coordinate system.
My advice is to really get familiar with the Transform objects : do not hesitate to inspect their properties each time you come across them. Don’t hesitate to examine their properties whenever you encounter them. They’ll provide insights into how Revit objects have been positioned and arranged within the 3D space.”