In the previous articles of this three-part series, we explored the foundational principles of the Model-View-ViewModel pattern for Revit add-in development. We began constructing a simple add-in to demonstrate these concepts, such as how to display Model data to the user.
As we dive deeper into the specificities of the M-V-VM pattern and the WPF technology, our third and final article will focus on the dynamic interaction between the View and the ViewModel layers. This article will guide you through handling user inputs, processing them through the Model layer, and ultimately displaying the results back in the View.
We will simplify complex WPF and M-V-VM concepts as we continue our exploration of software architecture. Building on our add-in’s example, we’ll continue illustrating some of the key points we’ve discussed before, such as data binding and the separation of concerns.
The entire project setup used in this series can be retrieved on GitHub.
Handling user’s events
Wall type selection
As seen in the previous article, we have configured our add-in window’s ComboBox control to display the Revit model’s wall types. Now, we need to register the user’s wall type selection, for the add-in to later process it and return its related width.
As a reminder, the ViewModel layer is responsible for storing the user’s selections and handling responses to user events. To record the user’s choice of wall type from the UI, we’ll introduce a new field in our ViewModel class that we’ll name _selectedWallType.
Yet, we still need to establish a link between the window’s Combo Box and this new field. For this purpose, we’ll use the WPF data binding feature. Our add-in’s architecture graphic may then be updated as follows :
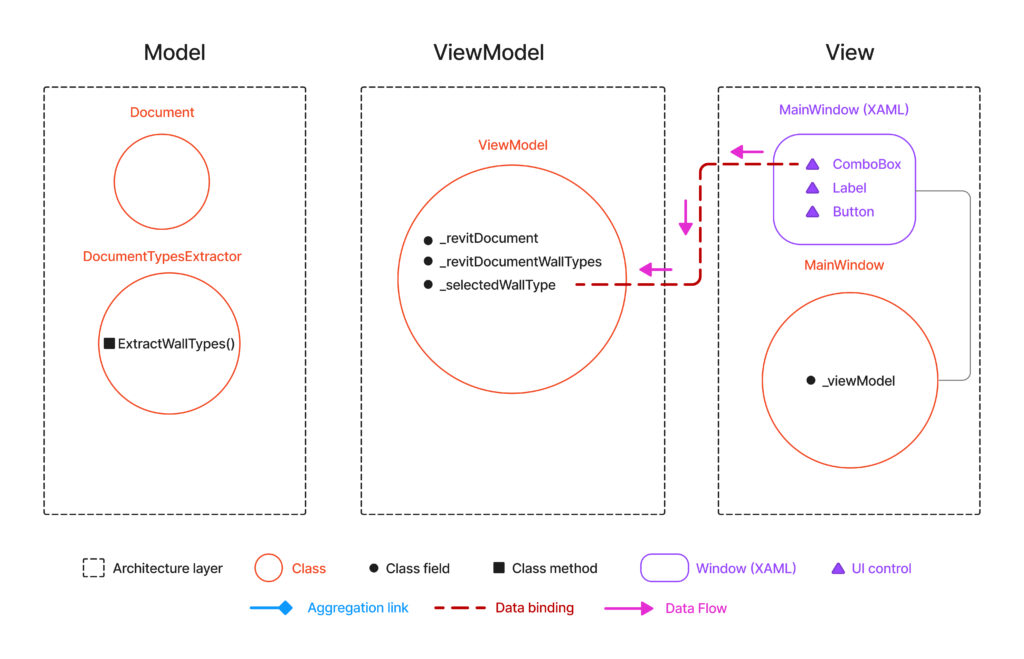
To implement data binding, we need to update the window’s XAML code. We may do so by assigning the “{Binding SelectedWallType}” keyword to the ComboBox’s SelectedItem property.
Since we’ve set the ViewModel class as the window’s data context, the SelectedWallType keyword refers to the ViewModel.SelectedWallType, which is a public property encapsulating the private ViewModel._selectedWallType field.
The window’s XAML code (Updated)
<Window x:Class="WallTypesDisplayer.MainWindow"
             xmlns="http://schemas.microsoft.com/winfx/2006/xaml/presentation"
             xmlns:x="http://schemas.microsoft.com/winfx/2006/xaml"
             xmlns:mc="http://schemas.openxmlformats.org/markup-compatibility/2006"
             xmlns:d="http://schemas.microsoft.com/expression/blend/2008"
             xmlns:local="clr-namespace:WallTypesDisplayer"
             mc:Ignorable="d"

             Height= "330"
             Width="500"
>
    <Grid>
        <ComboBox ItemsSource ="{Binding RevitDocumentWallTypes}" DisplayMemberPath="Name" SelectedItem="{Binding SelectedWallType}" HorizontalAlignment="Left" Height="22" Margin="206,130,0,0" VerticalAlignment="Top" Width="232"/>
        <Label HorizontalAlignment="Left" Height="26" Margin="206,163,0,0" VerticalAlignment="Top" Width="232" Foreground="Black" FontWeight="SemiBold"/>
        <Button Content="Return type width" HorizontalAlignment="Left" Height="23" Margin="202,242,0,0" VerticalAlignment="Top" Width="153" RenderTransformOrigin="0.5,0.5"></Button>
        <TextBlock HorizontalAlignment="Left" Height="19" Margin="49,130,0,0" TextWrapping="Wrap" VerticalAlignment="Top" Width="136" FontWeight="DemiBold"><Run Text="Document "/><Run Language="fr-fr" Text="w"/><Run Text="all "/><Run Language="fr-fr" Text="t"/><Run Text="ypes"/><Run Text=" :"/></TextBlock>
        <TextBlock HorizontalAlignment="Left" Height="45" Margin="45,30,0,0" TextWrapping="Wrap" VerticalAlignment="Top" Width="294" FontSize="28" FontWeight="Light"><Run Text="W"/><Run Text="all"/><Run Text=" types"/><Run Text=" "/><Run Language="fr-fr" Text="width"/></TextBlock>
        <TextBlock HorizontalAlignment="Left" Height="18" Margin="49,168,0,0" TextWrapping="Wrap" VerticalAlignment="Top" Width="136" FontWeight="DemiBold"><Run Text="Wall "/><Run Language="fr-fr" Text="t"/><Run Text="ype"/><Run Text=" width "/><Run Text="(mm)"/><Run Text=" "/><Run Text=":"/></TextBlock>

    </Grid>
</Window>
Returning wall type width
When the user selects a wall type, they can retrieve the corresponding width by clicking the ‘Return type width’ button. This action will make our add-in process an input (the chosen wall type) and display its related output (the wall type’s width) on the window.
Remember that for data to be displayed in a window, it needs to be stored in the ViewModel layer. For this purpose, we’ll add a _selectedWallTypeWidth field to our ViewModel class, updated whenever the user selects a wall type and asks for its width.
Additionally, we’ll introduce a new method, UpdateSelectedWallTypeWidth(), in the ViewModel class, which will update the ViewModel._selectedWallTypeWidth field in response to user action.
As we’ll later see, this method would also trigger logic within the Model layer. This design allows flexibility, and reinforces the ViewModel‘s role as a coordinator between the view and the model.
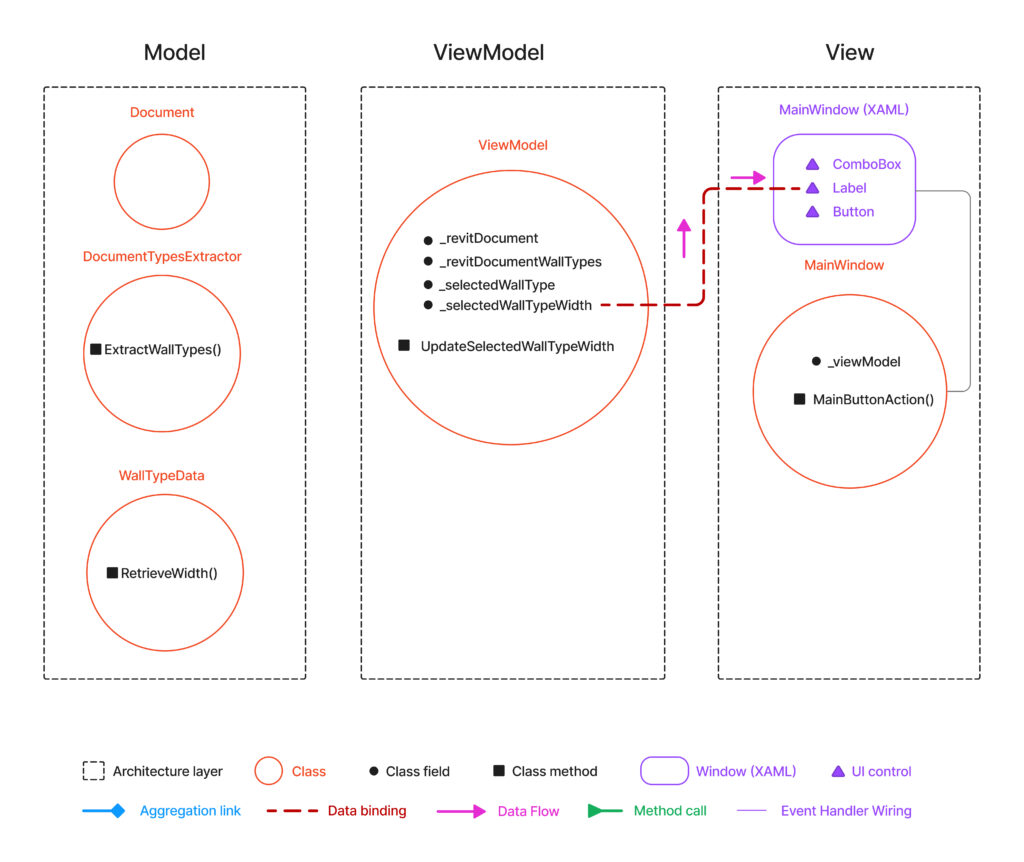
The following graphic shows how the ViewModel.UpdateSelectedWallTypeWidth() method is launched when the user pushes the “Return type width” button :
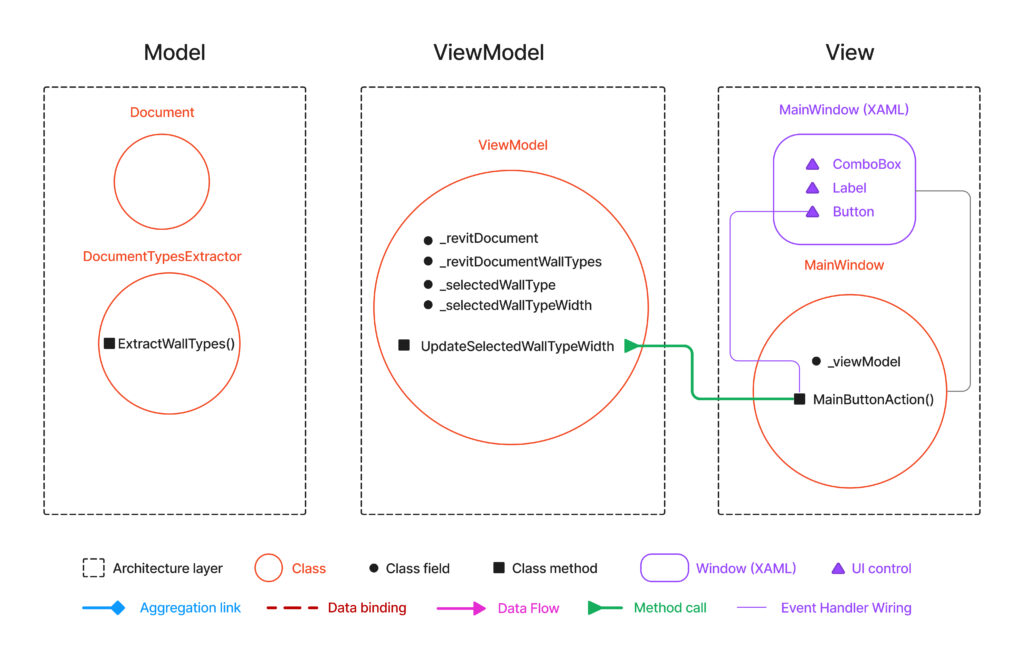
As seen previously, a WPF window is defined by a layout (XAML code) and a code-behind (C#). The window’s code-behind is where we define what shall happen when a window’s button is pressed. We do this by creating a new MainWindow.MainButtonAction() method, which will call the ViewModel.UpdateSelectedWallTypeWidth() method as the following :
using System.Windows;
using WallTypesDisplayer.ProjectViewModel;
using Autodesk.Revit.DB;


namespace WallTypesDisplayer
{
    public partial class MainWindow : Window
    {
        private ViewModel _viewModel;
        public ViewModel ViewModel { get { return _viewModel; } }

        public MainWindow(ViewModel vModel)
        {
            InitializeComponent();

            this._viewModel = vModel;
            DataContext = this._viewModel;
        }

        private void MainButtonAction(object sender, RoutedEventArgs e)
        {
            this._viewModel.UpdateSelectedWallTypeWidth();
        }
    }
}
We then define an event handler for the window’s button. This handler is linked to the MainButtonAction() method in the window’s code-behind. We accomplish this by using the Click attribute in the button’s XAML code, as follows :
The window’s XAML code (Updated)
<Window x:Class="WallTypesDisplayer.MainWindow"
             xmlns="http://schemas.microsoft.com/winfx/2006/xaml/presentation"
             xmlns:x="http://schemas.microsoft.com/winfx/2006/xaml"
             xmlns:mc="http://schemas.openxmlformats.org/markup-compatibility/2006"
             xmlns:d="http://schemas.microsoft.com/expression/blend/2008"
             xmlns:local="clr-namespace:WallTypesDisplayer"
             mc:Ignorable="d"

             Height= "330"
             Width="500"
>
    <Grid>
        <ComboBox ItemsSource ="{Binding RevitDocumentWallTypes}" DisplayMemberPath="Name" HorizontalAlignment="Left" Height="19" Margin="206,130,0,0" VerticalAlignment="Top" Width="232"/>
        <Label HorizontalAlignment="Left" Height="26" Margin="206,163,0,0" VerticalAlignment="Top" Width="232" Foreground="Black" FontWeight="SemiBold"/>
        <Button Content="Return type width" Click="MainButtonAction" HorizontalAlignment="Left" Height="23" Margin="202,242,0,0" VerticalAlignment="Top" Width="153" RenderTransformOrigin="0.5,0.5"></Button>
        <TextBlock HorizontalAlignment="Left" Height="19" Margin="49,130,0,0" TextWrapping="Wrap" VerticalAlignment="Top" Width="136" FontWeight="DemiBold"><Run Text="Document "/><Run Language="fr-fr" Text="w"/><Run Text="all "/><Run Language="fr-fr" Text="t"/><Run Text="ypes"/><Run Text=" :"/></TextBlock>
        <TextBlock HorizontalAlignment="Left" Height="45" Margin="45,30,0,0" TextWrapping="Wrap" VerticalAlignment="Top" Width="294" FontSize="28" FontWeight="Light"><Run Text="W"/><Run Text="all"/><Run Text=" types"/><Run Text=" "/><Run Language="fr-fr" Text="width"/></TextBlock>
        <TextBlock HorizontalAlignment="Left" Height="18" Margin="49,168,0,0" TextWrapping="Wrap" VerticalAlignment="Top" Width="136" FontWeight="DemiBold"><Run Text="Wall "/><Run Language="fr-fr" Text="t"/><Run Text="ype"/><Run Text=" width "/><Run Text="(mm)"/><Run Text=" "/><Run Text=":"/></TextBlock>

    </Grid>
</Window>
Processing the user’s selection
So far, we designed an application layout for listening to and handling the user’s selection and events. Let’s now see how to design and implement our add-in’s logic-related parts.
Let’s now create a WallTypeData class, to handle the retrieval of wall types data. We’ll also add a RetrieveWidth() static method to this class to fetch the width for each specific wall type. Since it processes elements from the Revit database, this method belongs to the Model layer.
As seen previously, the ViewModel.UpdateSelectedWallTypeWidth() method plays a coordinator role between the View layer (user’s selection and events), and the Model layer (The logic that processes the user’s selection). The following graphic represents this principle :
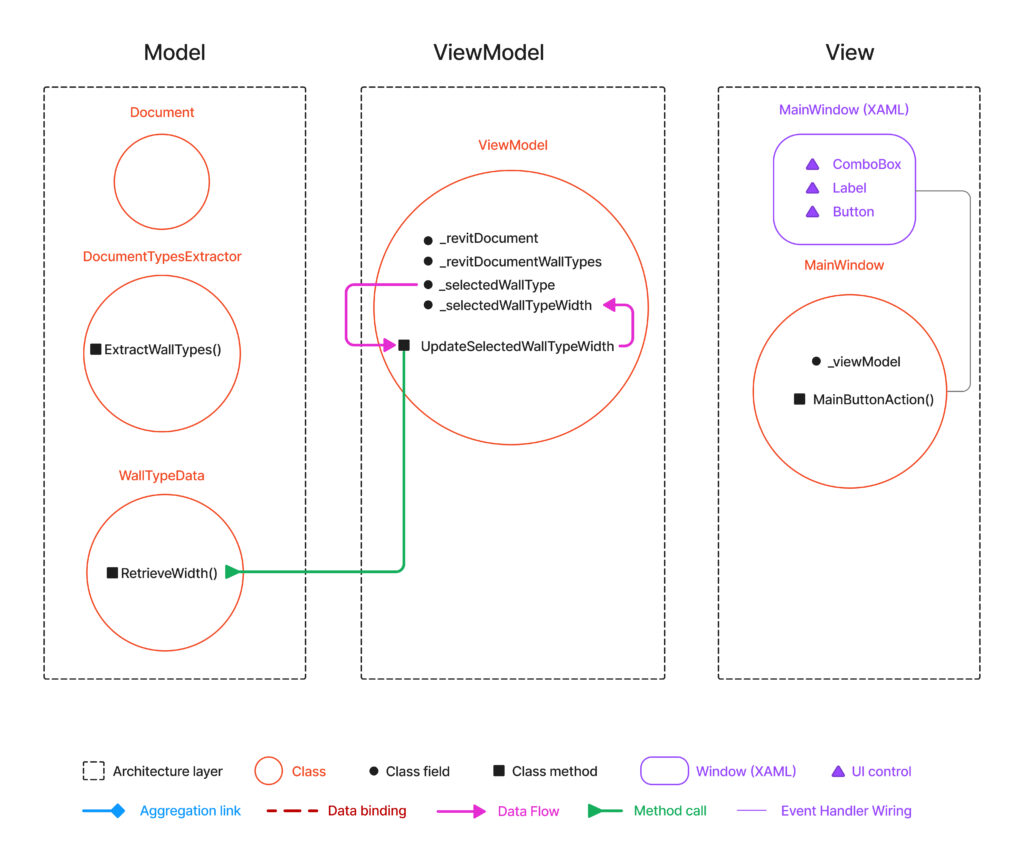
The ViewModel.UpdateSelectedWallTypeWidth() method calls WallTypeData.RetrieveWidth() with the user-selected wall type, then stores the returned width value in the ViewModel._selectedWallTypeWidth field for display by the add-in’s window.
The principle is that ViewModel layer methods delegate user selection processing to the Model layer methods, maintaining a clear separation of concerns. This approach ensures the ViewModel is an interface that models the View, enhancing modularity and extensibility for future functionalities in our add-in.
The WallTypeData.RetrieveWidth() method could be implemented as following :
The WallTypesData class :
using System.Linq;
using System.Text;
using System.Threading.Tasks;
using Autodesk.Revit.DB;

namespace WallTypesDisplayer.Model
{
    public class WallTypeData
    {
        public static double ReturnWidth(WallType wallType)
        {
            double WallTypeWidth_Feet = wallType.Width;
            double WallTypeWidth_Millimeters = WallTypeWidth_Feet * 304.8;
            return WallTypeWidth_Millimeters;
        }
    }
}
The ViewModel class (Updated)
namespace WallTypesDisplayer.ProjectViewModel
{
    public class ViewModel
    {
        private Document _revitDocument;
        public Document RevitDocument
        {
            get { return _revitDocument; }
            set { _revitDocument = value; }
        }

        private List<WallType> _revitDocumentWallTypes;
        public List<WallType> RevitDocumentWallTypes
        {
            get { return _revitDocumentWallTypes; }
            set { _revitDocumentWallTypes = value; }
        }

        private WallType _selectedWallType;
        public WallType SelectedWallType
        {
            get { return _selectedWallType; }
            set { _selectedWallType = value; }
        }

        private double _selectedWallTypeWidth;
        public double SelectedWallTypeWidth
        {
            get { return _selectedWallTypeWidth; }
            set { _selectedWallTypeWidth = value;}
        }

        public ViewModel(Document rvtDocument)
        {
            this.RevitDocument = rvtDocument;
            this.RevitDocumentWallTypes = DocumentTypesExtractor.ExtractWallTypes(this.RevitDocument );
        }

        public void UpdateSelectedWallTypeWidth()
        {
            this.SelectedWallTypeWidth = WallTypeData.ReturnWidth(this.SelectedWallType);
        }

    }
}
Displaying wall type’s width on the window
So far, we retrieved the wall type’s width and stored it in the ViewModel class. Let’s finally see how to display this information on our add-in’s window.
We may use data binding again to connect the window’s label, as the UI element that displays information, with the ViewModel._selectedWallTypeWidth field. The following graphic and updated XAML code show this principle :
The window’s XAML code (Updated)
<Window x:Class="WallTypesDisplayer.MainWindow"
             xmlns="http://schemas.microsoft.com/winfx/2006/xaml/presentation"
             xmlns:x="http://schemas.microsoft.com/winfx/2006/xaml"
             xmlns:mc="http://schemas.openxmlformats.org/markup-compatibility/2006"
             xmlns:d="http://schemas.microsoft.com/expression/blend/2008"
             xmlns:local="clr-namespace:WallTypesDisplayer"
             mc:Ignorable="d"

             Height= "330"
             Width="500"
>
    <Grid>
        <ComboBox ItemsSource ="{Binding RevitDocumentWallTypes}" SelectedItem="{Binding SelectedWallType}" DisplayMemberPath="Name" HorizontalAlignment="Left" Height="22" Margin="206,130,0,0" VerticalAlignment="Top" Width="232"/>
        <Label Content="{Binding SelectedWallTypeWidth}" HorizontalAlignment="Left" Height="26" Margin="206,163,0,0" VerticalAlignment="Top" Width="232" Foreground="Black" FontWeight="SemiBold"/>
        <Button Content="Return type width" Click="MainButtonAction" HorizontalAlignment="Left" Height="23" Margin="202,242,0,0" VerticalAlignment="Top" Width="153" RenderTransformOrigin="0.5,0.5"></Button>
        <TextBlock HorizontalAlignment="Left" Height="19" Margin="49,130,0,0" TextWrapping="Wrap" VerticalAlignment="Top" Width="136" FontWeight="DemiBold"><Run Text="Document "/><Run Language="fr-fr" Text="w"/><Run Text="all "/><Run Language="fr-fr" Text="t"/><Run Text="ypes"/><Run Text=" :"/></TextBlock>
        <TextBlock HorizontalAlignment="Left" Height="45" Margin="45,30,0,0" TextWrapping="Wrap" VerticalAlignment="Top" Width="294" FontSize="28" FontWeight="Light"><Run Text="W"/><Run Text="all"/><Run Text=" types"/><Run Text=" "/><Run Language="fr-fr" Text="width"/></TextBlock>
        <TextBlock HorizontalAlignment="Left" Height="18" Margin="49,168,0,0" TextWrapping="Wrap" VerticalAlignment="Top" Width="136" FontWeight="DemiBold"><Run Text="Wall "/><Run Language="fr-fr" Text="t"/><Run Text="ype"/><Run Text=" width "/><Run Text="(mm)"/><Run Text=" "/><Run Text=":"/></TextBlock>

    </Grid>
</Window>
The highlighted line in the XAML code above establishes data binding between the window’s Label and the ViewModel._selectedWallTypeWidth field, by assigning the “{Binding SelectedWallTypeWidth}” to the Label’s Content property. The add-in’s window is now connected and “listens” to the ViewModel class.
We would also like the window to be automatically updated each time the user asks for another wall type. We need to set up an automated process for this purpose, by having the ViewModel class implement the INotifyPropertyChanged interface.
In object-oriented programming, an interface is a set of functionalities that form a contract allowing different parts of an application to communicate. Such contract makes a class have certain methods and properties necessary to exchange data with other code parts. Let’s see the updated version of the ViewModel class to understand this principle :
The ViewModel class (Updated)
namespace WallTypesDisplayer.ProjectViewModel
{
    public class ViewModel : INotifyPropertyChanged
    {
        public event PropertyChangedEventHandler PropertyChanged;

        private Document _revitDocument;
        public Document RevitDocument
        {
            get { return _revitDocument; }
            set { _revitDocument = value; }
        }

        private List<WallType> _revitDocumentWallTypes;
        public List<WallType> RevitDocumentWallTypes
        {
            get { return _revitDocumentWallTypes; }
            set { _revitDocumentWallTypes = value; }
        }

        private WallType _selectedWallType;
        public WallType SelectedWallType
        {
            get { return _selectedWallType; }
            set { _selectedWallType = value; }
        }

        private double _selectedWallTypeWidth;
        public double SelectedWallTypeWidth
        {
            get { return _selectedWallTypeWidth; }
            set
            {
                _selectedWallTypeWidth = value;
                OnPropertyChanged();
            }
        }

        public ViewModel(Document rvtDocument)
        {
            this.RevitDocument = rvtDocument;
            this.RevitDocumentWallTypes = DocumentTypesExtractor.ExtractWallTypes(rvtDocument);
        }

        public void UpdateSelectedWallTypeWidth()
        {
            this.SelectedWallTypeWidth = WallTypeData.ReturnWidth(this.SelectedWallType);
        }

        private void OnPropertyChanged([CallerMemberName] string propertyName = null)
        {
            PropertyChanged?.Invoke(this, new PropertyChangedEventArgs(propertyName));
        }
    }
}
Implementing the INotifyPropertyChanged interface adds the PropertyChanged event the ViewModel class. As its name suggests, an event is a functionality that allows a class to inform another class about something significant that is happening or has happened in the context of the application.
In our case, the PropertyChanged event will be triggered once the public SelectedWallTypeWidth property of the ViewModel object is updated. The use of this event ensures that such change is communicated to and reflected in the add-in’s window, promoting a dynamic and responsive application.
To sum up, when the user selects a new wall type and asks for its width, the ViewModel object updates its states and informs the window about it by sending a message : the event is raised. The window listens to the ViewModel object and updates the information it displays accordingly.
Finally, we implement the OnPropertyChanged() method, which simplifies the process of triggering the PropertyChanged event. This method is called in the setter of each public property of the ViewModel class, therefore updating the window whenever that property’s value is changed.
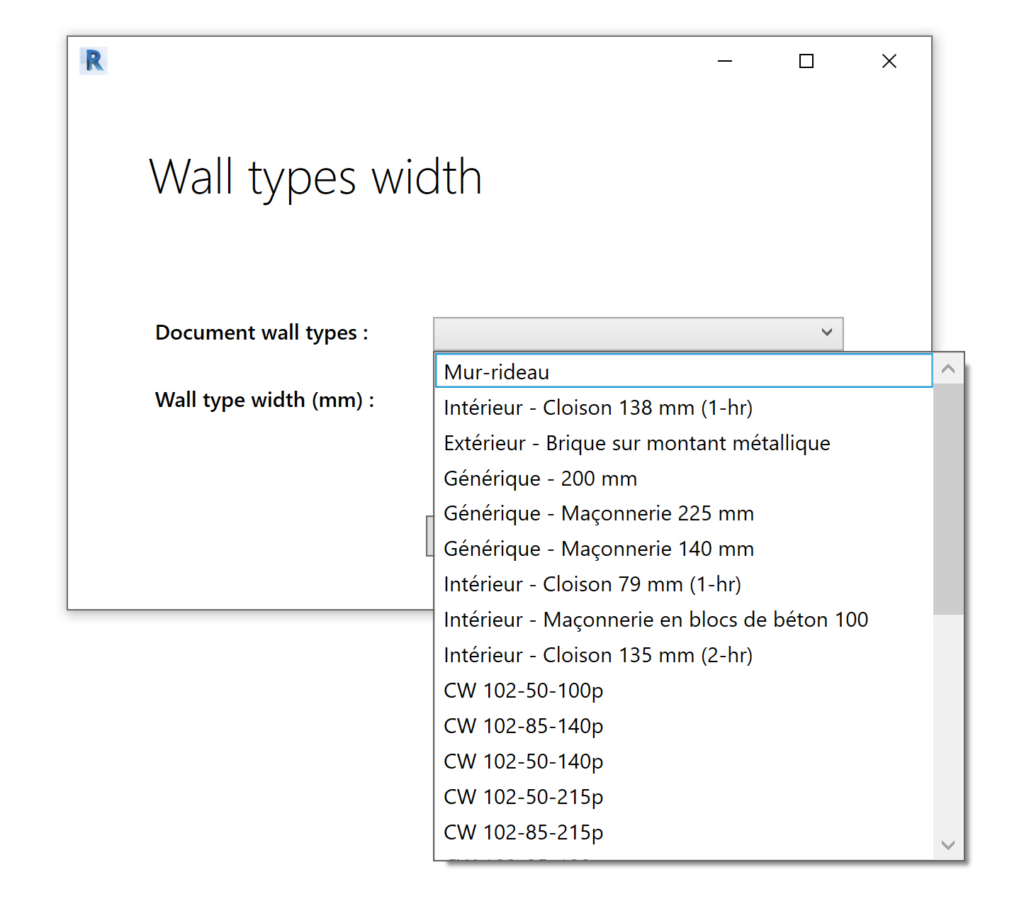
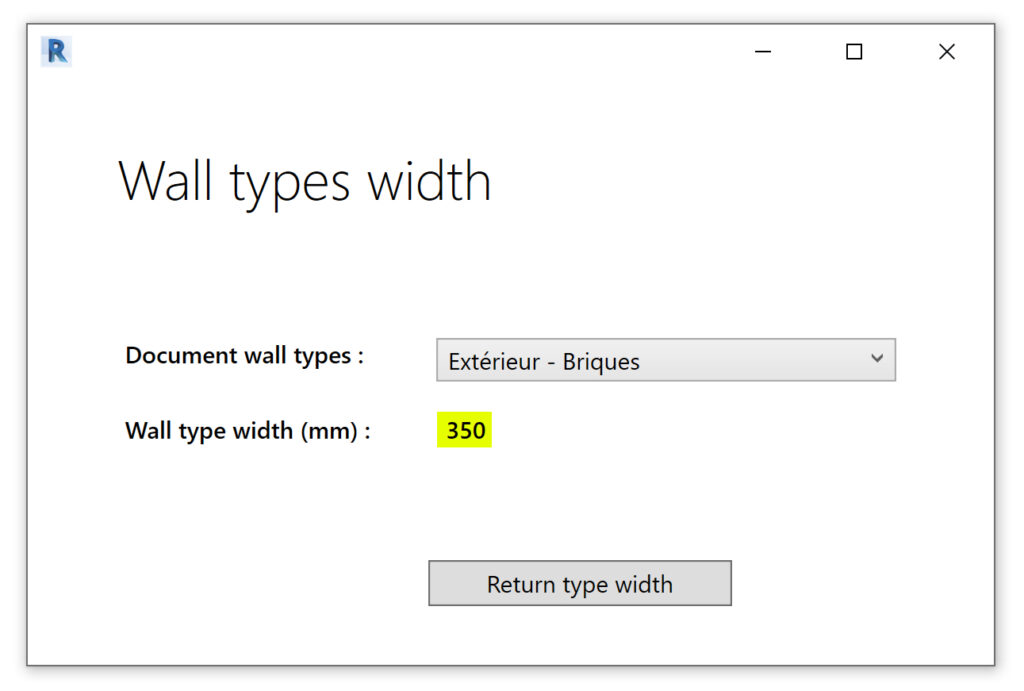
Now we have set up our M-V-VM add-in’s architecture, and obtain the following UI that gets updated each time the user selects a new wall type.
Conclusion
Throughout this series, we’ve covered key aspects of the M-V-VM architecture, showing its effectiveness in guiding the development process. By assigning specific responsibilities within the application, updates become more manageable.
This series sets the stage for deeper explorations into the Revit add-ins development, and more generally into software design and architecture. As it wraps up, the path forward remains filled with opportunities to apply and expand upon the principles discussed. The potential for enhancing software functionality and user interaction for Autodesk Revit is vast.
I hope this content will be valuable to you. Keep on pushing the boundaries and exploring new possibilities, and remember to connect at m-youssef@easyrevitapi.com for any further discussion.